Sleepy Pony @ Cyber Apocalypse 2024 CTF!
Vol 3: Rids and Flash-ing Logs
Preface
This is my first time trying my hands on a CTF event: HackTheBox Cyber Apocalypse 2024! I'm no hacker, but this event has a hardware category, so my friend invited me to a team to try them out. It turned out better than I thought! I was able to solve all of the 5 hardware CTFs! And here's my writeup.
Rids - Easy
Problem Statement
Upon reaching the factory door, you physically open the RFID lock and find a flash memory chip inside. The chip's package has the word W25Q128 written on it. Your task is to uncover the secret encryption keys stored within so the team can generate valid credentials to gain access to the facility.
What's Provided?
- A Docker instance
- One zip file
Capturing the Flag
First, we open the zip file. Inside is a single python script client.py
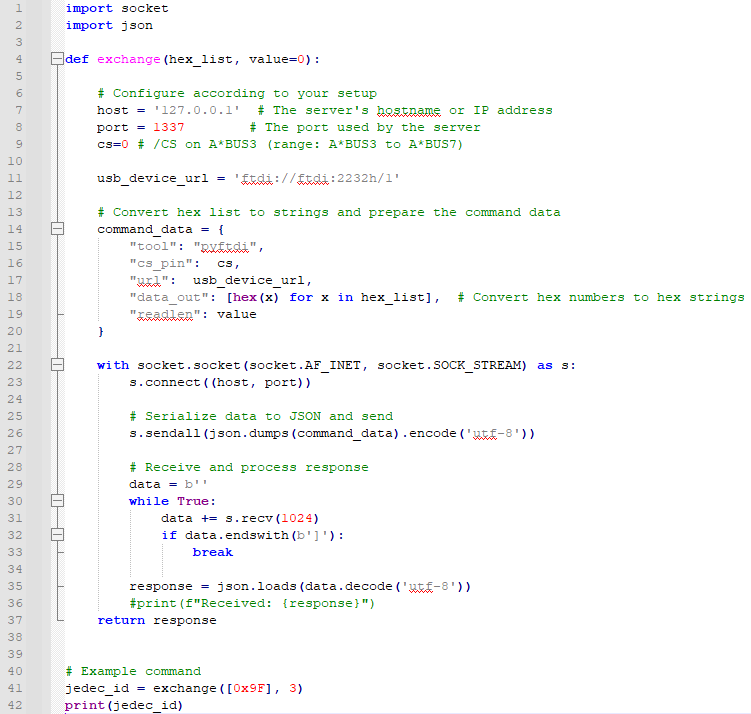
client.py script file
There is a single function inside called exchange. This function uses a python library pyftdi. Pyftdi is a library for communicating with FTDI USB IC directly from Python. FTDI is a brand well-known for their USB-to-Serial chips such as FT232RL. You can easily find them in microcontroller devboards and such. In this code it connects to the FT2232H USB-to-Multipurpose Interface IC. It can be connected to UART/JTAG/I2C/ SPI/Bit-Bang devices to control them right on your computer.
The rest of the function are just for sending and receiving binary data to/from the target device via network. You have to specify your Docker instance so the script knows where to connect. To use this function, simply provide a list of command bytes to send to the target device, and amount of bytes you expected to get back.
One example is provided in the file. exchange([0x9F], 3) will send a command byte 0x9F to the target, and try to get 3 bytes of response back.
In this case, a JEDEC ID of a memory chip (one byte each for manufacturer, type, and capacity of the chip).
Our Memory Chip
From the problem statement, we have to work with a memory chip again. This time a Winbond W25Q128 Serial Flash Memory IC. You can grab a datasheet from here to follow along.
W25Q128 is a flash memory IC with a capacity of 128Mbit in an 8-bit architecture. Unlike the AT28C16 in the last challenge, this chip uses a serial protocol to communicate. All modern memory chips these days use various serial protocol such as SPI and I2C because they offer greater flexibility, better speed, and much easier wiring. This chip only has 8 pins!
This chip supports SPI, DSPI, QSPI, and QPI protocols. Based on the FT2232H's capabilities, we assume the CTF uses SPI. This is by far the most common way and offers pretty decent speed of 104Mhz.
While the chip is also a memory chip, it is much more complex than a simple EEPROM. We will dig deeper later while we go through the challenge.
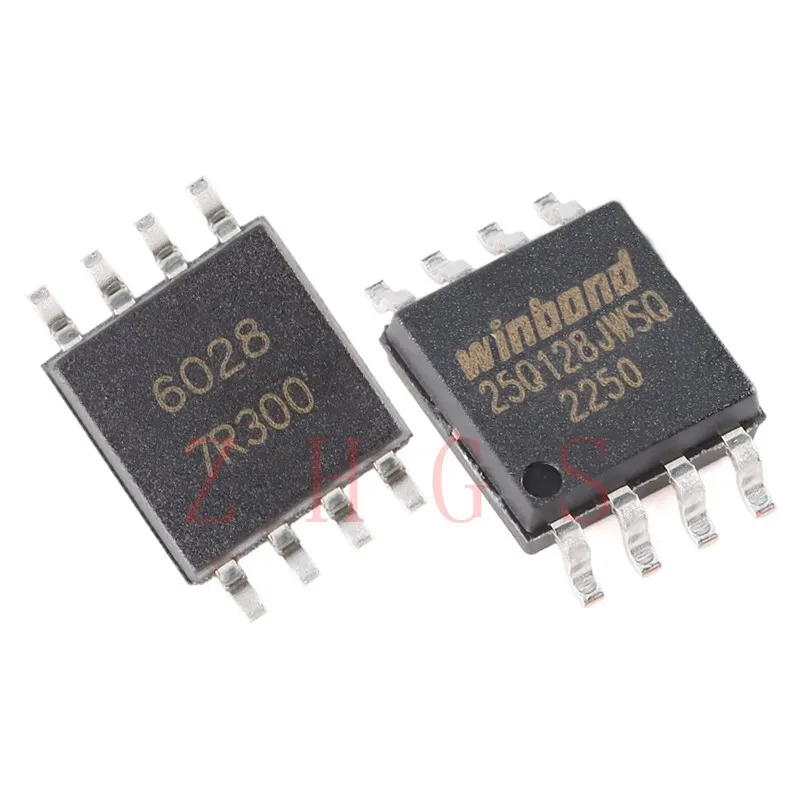
Real Life W25Q128 in a SOIC-8 Package (Source: eBay)
Dumping Data
First we attempt to dump a data out from the chip. The provided client script and the chip allows us to read as many bytes as we want but for the ease of reading we decided to read 256 bytes at a time. To communicate with this chip, we need to consult the Instruction Set of the chip provided in the datasheet. This will provided us with a command bytes syntax required for each operation with the chip. Below is the Instruction Set of W25Q128 chip. Most of what we need are in table 2.

W25Q128 Instruction Set Table 1 (Source: Datasheet)

W25Q128 Instruction Set Table 2 (Source: Datasheet)
To read data, we need to use the Read Data command. The command syntax is:
- Send command byte 0x03
- Send first address to read (3 bytes, big-endian)
- Send 8 dummy clock cycles, the chip will output 1 byte of data.
- The chip auto-increment to the next address, so we can just keep clocking it for more bytes.
To dump the first 256 bytes, the command would be exchange([0x03, 0x00, 0x00, 0x00], 256)
and this is what we got:
			> python .\client.py

			[72, 84, 66, 123, 109, 51, 109, 48, 50, 49, 51, 53, 95, 53, 55, 48, 50, 51, 95, 53, 51, 99, 50, 51, 55, 53,
			95, 102, 48, 50, 95, 51, 118, 51, 50, 121, 48, 110, 51, 95, 55, 48, 95, 53, 51, 51, 33, 64, 125, 255, 255,
			255, 255, 255, 255, 255, 255, 255, 255, 255, 255, 255, 255, 255, 255, 255, 255, 255, 255, 255, 255, 255, 255,
			255, 255, 255, 255, 255, 255, 255, 255, 255, 255, 255, 255, 255, 255, 255, 255, 255, 255, 255, 255, 255, 255,
			255, 255, 255, 255, 255, 255, 255, 255, 255, 255, 255, 255, 255, 255, 255, 255, 255, 255, 255, 255, 255, 255,
			255, 255, 255, 255, 255, 255, 255, 255, 255, 255, 255, 255, 255, 255, 255, 255, 255, 255, 255, 255, 255, 255,
			255, 255, 255, 255, 255, 255, 255, 255, 255, 255, 255, 255, 255, 255, 255, 255, 255, 255, 255, 255, 255, 255,
			255, 255, 255, 255, 255, 255, 255, 255, 255, 255, 255, 255, 255, 255, 255, 255, 255, 255, 255, 255, 255, 255,
			255, 255, 255, 255, 255, 255, 255, 255, 255, 255, 255, 255, 255, 255, 255, 255, 255, 255, 255, 255, 255, 255,
			255, 255, 255, 255, 255, 255, 255, 255, 255, 255, 255, 255, 255, 255, 255, 255, 255, 255, 255, 255, 255, 255,
			255, 255, 255, 255, 255, 255, 255, 255, 255, 255, 255, 255, 255, 255, 255, 255, 255, 255, 255, 255, 255, 255,
			255, 255, 255, 255, 255, 255, 255]
The first few bytes that are not 255 looks shiny! It's the flag! Convert them to ASCII and you got...
HTB{m3m02135_57023_53c2375_f02_3v32y0n3_70_533!@}
~~~~~
Flash-ing Logs - Hard
Problem Statement
After deactivating the lasers, you approach the door to the server room. It seems there's a secondary flash memory inside, storing the log data of every entry. As the system is air-gapped, you must modify the logs directly on the chip to avoid detection. Be careful to alter only the user_id = 0x5244 so the registered logs point out to a different user. The rest of the logs stored in the memory must remain as is.
What's Provided?
- A Docker instance
- One zip file
Capturing the Flag
First, we open the zip file. Inside is the same python script client.py as the Rids challenge. This CTF also use the same W25Q128 memory chip as the target so we will not go over that again.
The interesting part is a C source code file log_event.c. As you can see in the problem statement, this memory IC is used to record door entry events so C code is most likely how the door records its entry logs. Our task here is to find all log entries with user ID 0x5244 and replaces the user ID of these logs with someone else's ID to hide our presence while not modifying anything else. This means we need to write something to the chip, not just read!
The Door Log
Before we could do anything else, we have to know how the door records its log. log_event.c is quite large but I will only go over what is matter for the challenge.
First, we can see that each log entry is a SmartLockEvent
structure comprising of timestamp, event type, user ID, unlock method, and result.

SmartLockEvent Structure
In the log_event function, after verifying the chip and making sure the target address is empty,
we can see that it took the SmartLockEvent structure, serialized it, then calculate a CRC32 checksum and attached it to the end of the log.
Finally it calls the write_to_flash function to write the serialized data. The rest are just debug info.
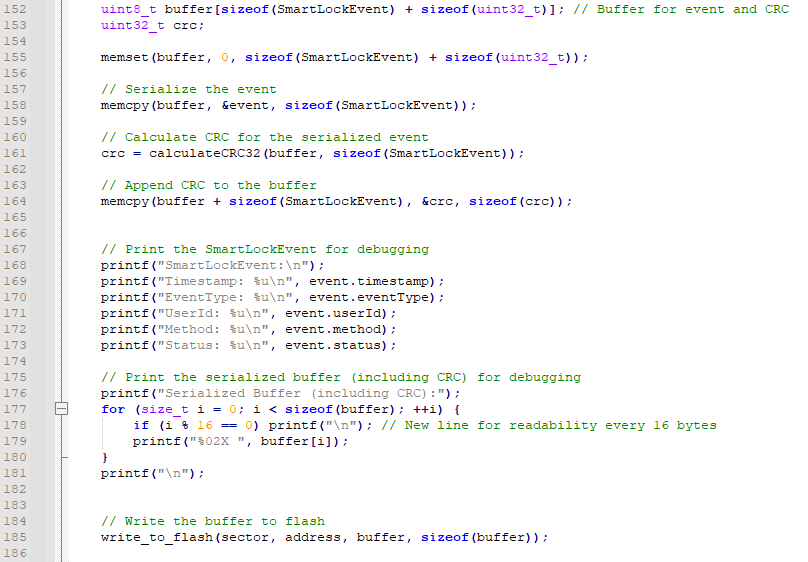
Part of the log_event Function

CRC32 Checksum Calculation Function
In the write_to_flash function, we can see that it doesn't just write the data. It encrypts the data first!
Before writing to the chip, it calls encrypt_data function.
This function first get the encryption key from the read_security_register function and put it in an array.
Then it XOR each byte of the key array with the input data excluding the CRC32 checksum and return the data back.
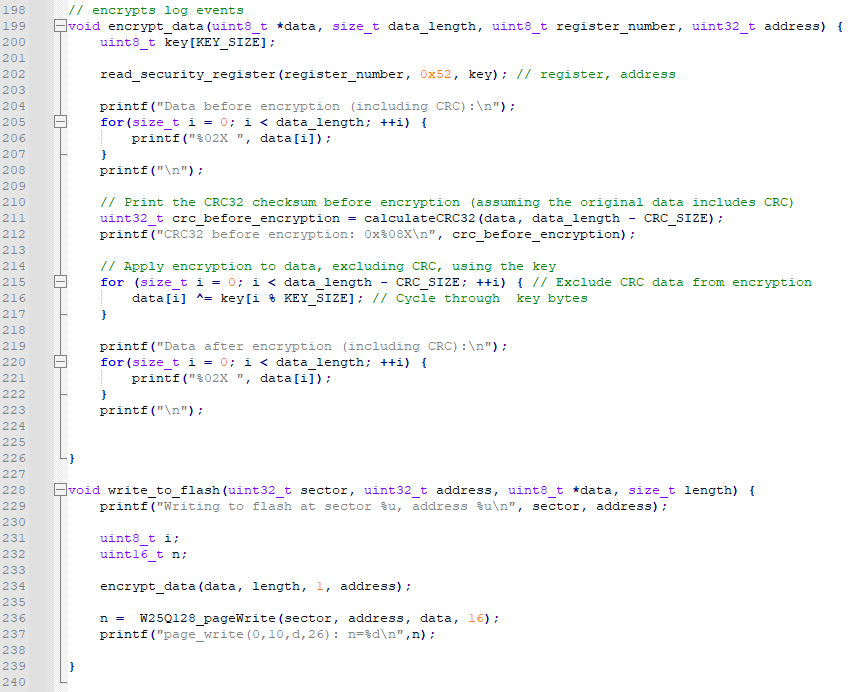
encrypt_data and write_to_flash Functions
So now our game plan is as follows:
- Dumping all the log data from the chip.
- Find the encryption key.
- Decrypt the log data.
- Find all user ID 0x5244 and replace them with a new value.
- Re-calculate the checksum of those logs.
- Re-encrypt all the logs.
- Write the new data back into the chip.
- Read the flag from the chip somehow.
Dumping the data
This step is the same as Rids challenge, I dump the data in batches of 256 bytes and found 2560 bytes of log data, from address 0x000000 to 0x0009FF. I put it in a text file for now for later processing.
Where's the Encryption Key???
There's one problem here: the source code of the read_security_register function is not provided.
We have no idea just by looking at this C file. Time to go to the datasheet!
In the Instruction Set table, we spotted something similar: the Read Security Register command. Going to the description of this command shows us that this chip features three of these 256-bytes registers that can be locked into read-only mode (OTP or One Time Program mode) by setting their lock bits. These bytes are located in a separate memory region and therefore requires a special command to access.

Here you can see the security registers on the top right of the block diagram (Source: Datasheet)
Now we need to make a guess from those C functions.
register_number parameter got passed from the write_to_flash function and this is always 1.
Another mystery parameter is a constant 0x52.
This probably means Security Register 1 Offset 0x52. Also the key length is defined in the code as 12 bytes.
To verify, I read from the chip with command exchange([0x48, 0x00, 0x10, 0x52, 0x00], 12) and got this:
[57, 222, 106, 153, 38, 93, 254, 137, 108, 6, 72, 83]
Looks promising! To proof that this is really our key, first thought is to find the encrypted version of user ID 0x5244
since we know that exists somewhere, and the key position are always static. However due to pony confusion (we will go into that later),
I failed to find that ID. I turned my attention to the timestamp instead. I took the first 4 bytes of data: [135, 116, 216, 252]
and XOR them with the first 4 bytes of key [57, 222, 106, 153]. The result is [190, 170, 178, 101], or
[0xBE, 0xAA, 0xB2, 0x65] in hex. Checking the number 0x65B2AABE (or 1706207934) with a Unix Timestamp Converter
shows that it is a timestamp for Thu Jan 25 2024 18:38:54 which is reasonable. I assumed at this point that we are on the right track.
Also, we now know that this is a little-endian system,
which is important when we need to work with 16 and 32 bytes values in the log.
Structure Memory Alignment
The reason I failed to find a matching user ID earlier is because I forgot about structure memory alignment in C. C structures are just a continuous bytes in memory that can store all of the data we specified. We can just reserved the exact amount we need, but to increase the performance of the program, C compiler will optimize the memory allocation to align with how the CPU fetches the data. If you want to learn more about this, you can read this Medium article. The alignment is dependent on the architecture of the computer, but it's most likely 32 or 64 bits alignment.
Now it's more like taking an educated guess. A quick sizeof(SmartLockEvent) returns 12 bytes. This means a particular online C compiler I used uses 32-bit alignment
because 12 can be divided by 4 cleanly. This also aligns greatly by the fact that our encryption key is 12 bytes long.
Combining this with a 4-byte CRC32 checksum means one log is 16 bytes long.
To know exactly how each byte is allocated, we can use a union.
C union is similar to struct, but all of the variables inside are allocated the same block of memory.
This means we can union a SmartLockEvent with plain 12-byte array to print the exact value of each byte.
This is the resulting structure of the SmartLockEvent struct plus checksum:

SmartLockEvent Memory Alignment
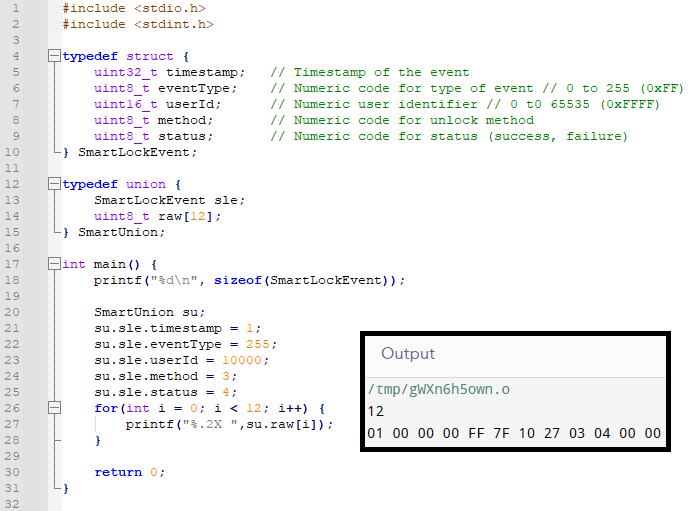
Finding the Memory Alignment with Union
Revealing the Logs
Now that we know the memory alignment and the encryption key, we can easily decrypt the log. I wrote a short python script that takes the data from the chip, decrypt them, and format the data into the CSV form.
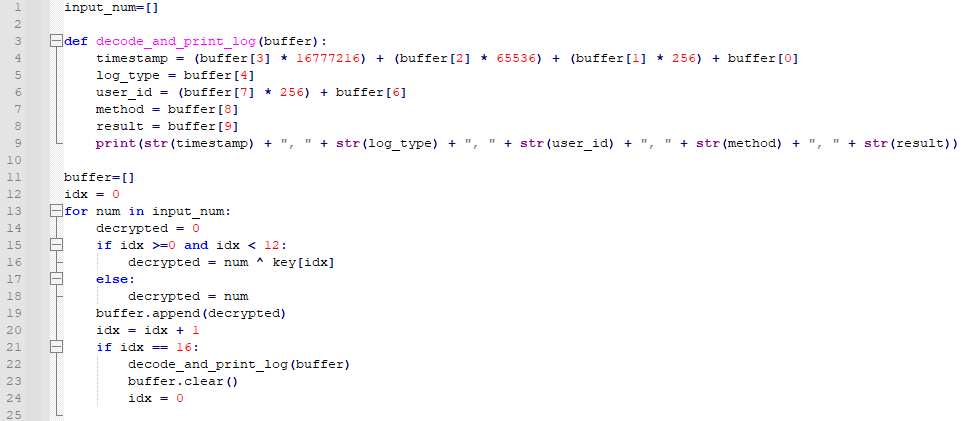
A Python Script to Decrypt the Logs
Here's some of the decrypted logs:
		    1706207934, 5, 575, 1, 1

			1706262045, 249, 879, 2, 1

			1706322958, 108, 28, 3, 1

			1706325696, 5, 952, 2, 1

			1706353558, 108, 28, 2, 1

			...

			1712644769, 215, 575, 2, 1

			1712702755, 214, 21060, 1, 1

			1712714687, 187, 21060, 3, 1

			1712723427, 187, 21060, 3, 1

			1712750575, 214, 21060, 3, 1
Here we are. There are 4 log entries with userId = 0x5244 (21060 in decimal).
Making the New History
Now we just need to change 21060 to any other user ID. I decided to change them to 575 (from other log entries).
Then, we can just calculate the new checksum for the logs and encrypt them
using the original functions in the log_event.c file.
We can replace the last 64 bytes in the original data and now we have the altered log ready to be put back in the chip.
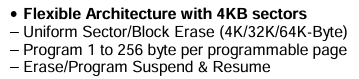
Before we continue, we have to understand some important nature of flash memory chips first. Unlike an EEPROM chips, flash memory chip cannot be written or erased at the byte level (byte granularity). You typically have to write and erase in groups of continuous bytes called pages or blocks. For this particular chip, you can write the data one page at a time (max 256 bytes), and you can erase the data one sector (4KB), one block (32 or 64KB), or the whole chip at a time. See the block diagram above for more details.
Another thing is that, you cannot write to the memory location that had already been written to without erasing it first. You can think of these memory chips as a big array of bits, each bit has a "fuse" it in. When this fuse is intact we read the bit as one and when the fuse is blown we read zero. The chip in its factory condition comes with all fuses intact. That's why empty memory are read as 0xFF. Writing to the chip is actually "blowing" the fuses on the bits that have to be zeroes, leaving ones untouched. This is how old ROM chips physically works. In EEPROM chip the only difference is that we can "un-blowing" the bits by erasing them. We need to erase before write because that is the only way to turn zeroes back into ones.
Last thing, to perform any action that will alter the data on the chip, such as writing or erasing, we need to pull the chip's !WP pin high, and send the Write Enable command first. This step must be done before every data-altering commands. (Note that the !WP pin step is handled by the server and we don't have to do that in this challenge.)
Write and Erase Description in the Datasheet
We might only need to alter 64 bytes of data, but due to the fact that we need to erase before writing and that the smallest granularity of erase we can do is 4KB, we literally have to erase everything and write every log entries back in, 256 bytes at a time.
First step is to erase the existing log data from the chip. Since all the data are 2560 bytes long and starts from address 0x000000,
Everything are in the first 4KB sector. To erase this, we have to use the Sector Erase (4KB) command.
To execute this, we first enable writing with the exchange([0x06]) command, then
erase the first sector with exchange([0x20, 0x00, 0x00, 0x00]) command.
To verify that the operation was successful, try reading the first 256 bytes. It should be all 255.
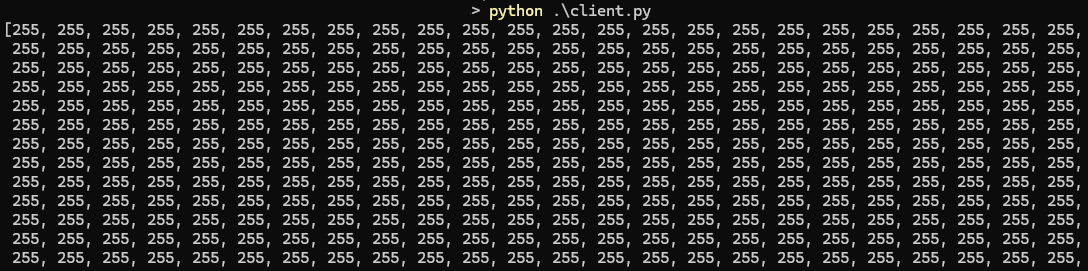
It's all gone!
To write the data, again we need to enable writing with exchange([0x06]) command.
Then we use the Page Program command. The syntax is: 0x02 + page address + max 256 bytes of data.
Since we already have log data in blocks of 256 bytes,
we just need to add 0x02 and page address in front of each list and write all of them one by one.

Python Script for Writing New Data into the Chip
To verify that the data is in, you can query them out to see if 255s have been replaced by our data. If not then go back to your Python script to check for errors, then try again. (Don't forget to erase first!)
Now what?
Now that user ID 0x5244 are all gone and we've covered all of our tracks, we can go back to our client.py file.
There's this tiny line at the top of the file:
FLAG_ADDRESS = [0x52, 0x52, 0x52]
This sounds like the address of the flag! At first this address contains only 255s. But what does it contains now?
We run a quick command exchange([0x03, 0x52, 0x52, 0x52], 256) and here's the result:
			> python .\client.py

			[72, 84, 66, 123, 110, 48, 55, 104, 49, 110, 57, 95, 49, 53, 95, 53, 51, 99, 117, 50, 51, 95, 119, 49, 55,
			104, 95, 112, 104, 121, 53, 49, 99, 52, 49, 95, 52, 99, 99, 51, 53, 53, 33, 64, 125, 255, 255, 255, 255, 255,
			255, 255, 255, 255, 255, 255, 255, 255, 255, 255, 255, 255, 255, 255, 255, 255, 255, 255, 255, 255, 255, 255,
			255, 255, 255, 255, 255, 255, 255, 255, 255, 255, 255, 255, 255, 255, 255, 255, 255, 255, 255, 255, 255, 255,
			255, 255, 255, 255, 255, 255, 255, 255, 255, 255, 255, 255, 255, 255, 255, 255, 255, 255, 255, 255, 255, 255,
			255, 255, 255, 255, 255, 255, 255, 255, 255, 255, 255, 255, 255, 255, 255, 255, 255, 255, 255, 255, 255, 255,
			255, 255, 255, 255, 255, 255, 255, 255, 255, 255, 255, 255, 255, 255, 255, 255, 255, 255, 255, 255, 255, 255,
			255, 255, 255, 255, 255, 255, 255, 255, 255, 255, 255, 255, 255, 255, 255, 255, 255, 255, 255, 255, 255, 255,
			255, 255, 255, 255, 255, 255, 255, 255, 255, 255, 255, 255, 255, 255, 255, 255, 255, 255, 255, 255, 255, 255,
			255, 255, 255, 255, 255, 255, 255, 255, 255, 255, 255, 255, 255, 255, 255, 255, 255, 255, 255, 255, 255, 255,
			255, 255, 255, 255, 255, 255, 255, 255, 255, 255, 255, 255, 255, 255, 255, 255, 255, 255, 255, 255, 255, 255,
			255, 255, 255, 255, 255, 255, 255, 255]
Hey! What's that! It's no longer all 255s! Convert them to ASCII and you got the last flag to conclude the hardware section, which is...
HTB{n07h1n9_15_53cu23_w17h_phy51c41_4cc355!@}
~~~~~
Here is the end of Vol 3. To conclude, I think they are a well-made challenges and I enjoyed solving them. I was proud to be able to solve them all and I would like to play again in the future! :D
~~~~~
Last Update: 20 Mar 2024
- 20 Mar 2024 - Fix typo
- 14 Mar 2024 - First published